Wednesday, December 14, 2011

"Call of the Triton" - Finally Finished!


"Call of the Triton"
watercolor
30" x 22"

Okay, I admit it!  I have been a bad blogger!  My apolgies to everyone who's been trying to follow along with this piece, only to have me completely kill your enthusiasm by not ever posting! So, here it (finally) is!

I was very happy with how everything turned out. I darkened the background a bit to give the piece as much "pop" as possible.  Then, I brought some yellow reflections down into the water and planted some little jewels of turqouise around the rest of the painting to provide color harmony.  Otherwise, the blue would stand out too much and not blend in with the rest. I also was able to finish the water falling from the fountain by putting in the final darks without losing the "soft" quality of the rushing water. This was the most challenging part of "Call of the Triton" by far, and I have to say, I am very happy with the overall results!

This piece piqued my interest in the subject and I'm currently planning to do more paintings that focus on fountains and sculpture, whether they be from Rome, Paris, or some other as yet undiscovered land.  I'll keep you posted here, so stay tuned.

As always, please don't hesitate to send me any questions that you may have.

And my number one resolution for 2012? I promise to be a better blogger!

Thursday, December 9, 2010

Trevi Fountain - Step 8


Most of my attention at this point is on the rocks, waterfall, and water. Water is usually best rendered with soft edges and this is a key part of this piece. The softness of the water contrasts nicely with the harder edges of the figures and achitecture in the background.


For the water in the foreground, I've added some little ripples. It's naturally choppy because of the splashing waterfalls, so no big waves, just lots of little ripples going every which way. A turqoise mixture of Cobalt with a bit of Winsor Green works well. I'll also take some of this color later and introduce hints of it in the figures and shadows for overall harmony.


I've further defined the rocks on the right side by adding some of the shadows. It's amazing how much more three-dimensional something looks once you begin to add the darks.


The job of defining the rocks under the waterfall is not quite so easy. In fact, it's a pain in the neck! I add gradually darker layers but I have to be very careful to keep the edges soft. Otherwise, the water will appear "cut out". Jagged edges (like in the last step) and outlines that are not fully defined are the key to making the rocks seem like they are behind the falling water.


Monday, September 27, 2010

Trevi Fountain - Step 7


It's time to start sculpting the rocks and figures by adding some dark areas to give them form. It's the shadows that define the rocks and make them seem three-dimensional. Notice how I've tried to make the shadows visually interesting by fluctuating from warm to cool. At this point, I also wanted to put in my darkest area so that I could balance everything else according to that value. This usually helps keep me from being too light in other areas.


I'm still not completely sure how I'm going to tackle the falling water, so I tread lightly. The first step is to paint around the white parts of the water with the lightest version of the underlying color.


Now, this doesn't look much like water yet, so you have to be patient. All I'm doing here is starting to define the shapes underneath the water. You don't want the rocks to be very clear since you are seeing them through a wall of water. It's too difficult to paint soft, wet-into-wet edges here since I'm trying to paint around the white water, so I have to rely on jagged outlines to make the rocks appear to have soft, blurry edges (picture an impressionistic painting).


All in all, I'm pleased with how things are turning out so far, but I realize the most important and difficult parts of the painting are still to come.

Friday, July 16, 2010

Trevi Fountain - Step 6


Ahh, the fun part - the water! Yes, water is difficult to paint. Yes, it is moving and can look a million different ways depending on the light, the type of water, what's underneath the water etc., etc. But, if you really just look at it as shapes and values like anything else you're trying to paint or draw, then it's just not that hard. (now faces and hands, that's another story entirely!)


One thing to be aware of when painting water is your edges. Generally, you want them to be soft, especially in the underlying layers. As you can see here, everything is wet-into-wet, and you want your brushstrokes to be coming STRAIGHT towards you (notice the pool at the top of the fountain). Anything that reflects on the surface of the water will come STRAIGHT towards the viewer and be a mirror image of the object being reflected. I can't tell you how many paintings I've seen ruined by reflections that didn't line up.


The falling water is definitely going to be the toughest part of this painting. In my initial drawing, I tried to highlight the parts of the water that would be white, but I'm going to have to save them without leaving hard edges (since I want the water to look like it's moving). For right now, I've just painted the white parts of the water that are in shadow. It's always funny to me how that area looks dark right now, but will actually be one of the lighter areas once I'm done.


As a side note, I love the turquoise (Cerulean and Winsor Green, I think) color of the water because it provides such a nice contrast with the warm colors of the figures (and it's one of my favorite colors), but I'll have to be sure to carry that color up into the background later and vice versa to provide balance.

Wednesday, October 28, 2009

Trevi Fountain - Step 5


More first layers here. Notice how I'm just painting around the water flowing down the rocks and how the general shapes are adding form without really putting in the darks yet. I'm also starting to darken the background a bit to further establish the overall value range for the painting.

Trevi Fountain - Step 4

I've been a little bit behind lately, so I'm going to rapid-fire the rest of these steps just so I can get this wrapped up. Please let me know if you have any comments or would like more info on any of the steps.

I've started to add some shadows to the figure. Notice how he's starting to pop out from the background and look three-dimensional.

Monday, September 14, 2009

Trevi Fountain - Step 3


These first washes for the figures and fountain are all about establishing temperature. The shadows and water will be predominantly cool, so I want lots of warm reflected light instead of cool grays. That will help build an exciting contrast and will hopefully make the painting more visually interesting. Also, notice that there will be plenty of warm colors in the overall cool shadows and vice versa for balance and harmony. Do not be afraid to push your colors. Try to get away from the "Payne's Gray doldrums" that haunt most beginners' work.

At this point, I am defining the figure by surrounding the lightest areas with washes of Raw Sienna. This is merely the first layer of many that will eventually create a three-dimensional appearance, but you can begin to see the forms.

I decided to put in some of my darkest darks behind the fountain to establish my value range (this painting will run the full gamut, from white paper to almost black).

Monday, August 24, 2009

Trevi Fountain, Step 2


Ok, finally. Here's step two. Finally. (Sorry about the two month gap in steps - it's been a really busy summer!)

I've decided to establish the shadow area behind the two figures first. This initial wash is for the surfaces that are in shade but are receiving the most reflected light. I've chosen to use a loose, wet-into-wet blend of Ultramarine Blue, Alizarin Crimson, and Burnt Siena. Notice how I varied the color of the wash by adding more or less of the colors as I moved around. This sets the stage for a vibrant and interesting dark area.

I'll probably have to darken this area a bit later, but it's a good start. I'm excited about the composition at this point, and it looks like my placement and overall drawing are going to work. Hopefully. (You can't see this, but my fingers are crossed right now.)

Friday, June 5, 2009

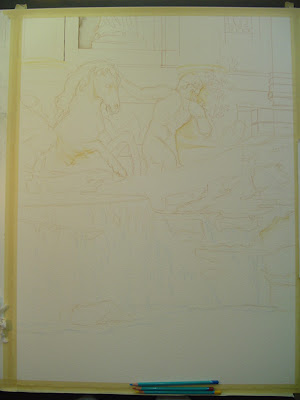
Trevi Fountain Step 1 - the drawing


I decided to focus on an intimate, smaller section of the fountain for this piece instead of trying to capture the whole thing (maybe next time), so I picked the triton on the right side of Neptune.

The idea of the composition is to have the background in shadow so that the highest contrast (and focal point) will be on the man and horse. Then, the viewer's eye should travel with the water down over the rocks to the pool, then back up to the top again.

I use watercolor pencils to sketch out the composition because they mostly dissolve once I paint over them and the tiny marks that remain add little splashes of subtle color to the finished painting. One tip if you decide to use watercolor pencils as well: erasing them with clear water and a brush usually works better than using an eraser. You can see some areas where I've used water to blend some of the sketch lines and I've left the color.

I typically sketch all the shapes lightly first to get the placement right, then come back in with darker lines to refine the details. I don't include every detail at this point, just enough to know where the major shapes and white/light spots are.

Monday, June 1, 2009

Step-by-Step: Painting the Trevi Fountain


One of my favorite subjects from my travel to Italy was the plethora of incredible fountains that are found all over the country, especially around Rome. My past efforts to capture some of these have been alot of fun to paint and have been very well-received by my collectors. However, I haven't yet attempted to paint that most famous of fountains, the Trevi. Until now, that is.


One of my collector friends (you know who you are, Michael) has been hounding me to paint the Trevi for years now, but I've always been too busy with other series, commissions, etc. to attempt it. It's quite a challenging subject after all, mixing figurative elements and water, two of the most difficult subjects to paint.


Anyways, I'm throwing caution to the wind, and I'll be letting you watch as I tackle one of the most famous landmarks in all of Italy. I hope you enjoy it (and I sure hope it works out!)


Stay tuned...

Wednesday, April 8, 2009

Summer 2009 Schedule

Well, it looks like it's that time of year again. That time when people stop being jealous of our weather here in Arizona. When we're either in the air conditioning, the swimming pool, or covered with enough sun block to protect you on the actual surface of the sun. When the critters like scorpions and rattlesnakes come out and the snowbirds go home. And for some strange reason, there's not much happening with the art scene here this time of year. Hmmm.

That's why summer is the time for me to hit the road. No big Europe trips planned until at least next year, so my schedule looks about the same as it has the past couple years:


La Jolla Festival of the Arts
June 20 - 21
9 AM - 5 PM

Breckenridge Art Festival
July 24 - 26
10 AM - 6 PM

Park City Kimball Arts Festival
August 1 - 2
9 AM - 7 PM (6 PM Sunday)

Sausalito Art Festival
September 5 - 7
9 AM - 6 PM (5 PM Monday)


Hopefully, you can make it to one of these beautiful, high-caliber events to view my newest works. Please let me know if you need any further information as well.

And enjoy your beautiful summers, blah, blah, blah. You'll be shoveling snow again before you know it. :)


Monday, October 6, 2008

As If Watercolor Wasn't Already Hard Enough...


Do you ever feel like you just can't get the monkey off of your back?

Well, say hello to my five year old son whose two favorite things in the world are smiling/laughing and climbing on EVERYTHING (especially Dad). Just wanted to throw this in here for you parents out there who may be able to relate to this just a little as well as anyone else who may be thinking about working out of the house. Be prepared to work through ANY and ALL types of distractions!

(Anyone know a good chiropractor?)

Thursday, June 5, 2008

New Original

I just wrapped up this brand new watercolor, "Antibes Door" (15" x 11"; $1,400). I painted it as a demonstration piece for an upcoming article in Watercolor Artist magazine (one of my favorites) that focuses on texture and light.

The door itself came from Antibes on the French Riviera, one of the Riviera towns that I really liked. My favorite part of this piece: it's a tie between the streaming shadows on the wall and how the texture turned out on the door.

Want to see how I painted it? Sorry, you'll have to wait until the article comes out :-) It's currently slotted for the October issue.

Anyone interested in adding this little gem to their collection should contact me directly (623-551-5692 H, 623-330-7647 C, or steve@stevestento.com) or come out to the La Jolla Festival of Fine Art on June 28 - 29 to view it in person.

Friday, May 2, 2008

Summer Schedule

Many, many thanks to those of you who came out to see my artwork at the La Quinta Art Festival, the Indian Wells Art Festival, and Superstition Mountain's Piazza Party over the past couple months. Whether it was your first time seeing my watercolors or your 50th (OK, stop stalking me), I hope you came away impressed and hopefully moved by the experience. After all, that's what it's all about. I'm very passionate about the things that I paint, and if you can feel some of that connection, then I've done my job.


Here's where you can see my newest works this summer:


La Jolla Festival of Fine Art
June 28 - 29
La Jolla, CA

Aspen Arts Festival
July 19 - 20
Aspen, CO

Breckenridge Main Street Art Festival
July 25 - 27
Breckenridge, CO

Sausalito Art Festival
August 30 - September 1
Sausalito, CA

So, there you have it. (And, no, it's not a coincidence that I'll be in a lot of beautiful places that are all cooler than Phoenix!) I hope you can make it to one of these fine events, and please let me know if you'd like any more information.

Monday, March 24, 2008

Night Scene - Step 10


Step 10 - Completion

For this final stage, I knew the sky needed to be stronger and darker to give the light areas the proper glow. Continuing to "push" a watercolor at this point can be a risky move, since it's not usually possible to go lighter again and you also never know when you're gonna have one of those "@%#*! water has a mind of its own" moments. That's just one of the thousand or so decisions you'll have to make during a painting, but, like I mentioned before, 9 times out of 10 I make the painting better by pushing it a little farther. The most important thing is to not be afraid to make that decision - it's not like it's your last painting ever and, no, your life does not depend on it, no matter how much time and paint you've already put into it.

Having made my decision to continue, I closed my eyes (just kidding), turned the piece upside down again and hit the upper part of the sky with a strong mixture of Alizarin Crimson and Pthalo Green. In this case, I'm really happy that I decided to go darker. Overall, the painting is very close to my initial plan, and I feel like everything is working (despite the fact that there are always little areas that only I notice where I could have handled things better).

So, there you have it, the Charles Bridge in Prague at night in watercolor. Hopefully, you're all ready now to go tackle that night scene that you've been putting off for the last three years!

Just remember, there's no such thing as the perfect painting, your next one's going to be your best, and it really is about the journey, not the destination.